Showing posts with label BOSH Lite. Show all posts

Diego : Next Generation Runtime of Cloud Foundry


You might be already wondering about what 'Diego' is. If so, this might be a very useful post for newbies in Cloud Foundry. So what 'Diego' actually is? How is it related to Cloud Foundry? How is it different from build-pack mechanism? Please be patient. You will soon find solutions to all your problems. Let's proceed then. 

What is Diego

In a Cloud Foundry deployment without Diego, the Cloud Controller schedules and manages applications on the Droplet Execution Agent (DEA) nodes. Diego replaces the DEAs and the Health Manager, and assumes application scheduling and management responsibility from the Cloud Controller. Diego combines scheduler, runner and health manager. DEA, Health manager and Warden were rewritten in 'Go' , DEA + GO , hence it is called 'Diego'. 

Diego is a rewrite of the Cloud Foundry runtime. Why this was written again? The existing code is hard to maintain and add features. In case of the DEA and Health Manager, which Diego removes the need for, the code was too enmeshed with the Cloud Foundry code-base. So they wrote Cloud Foundry again in a different way which is now called 'Diego'.

At its core, Diego is a distributed system that orchestrates containerized workloads. I will describe each of these terms  separately.

distributed system ? 
If you look into running Diego installation, you will see a pile of VMs which you call 'cells'. They have containers running applications in them. There is also a handful of highly available VMs called 'Brain'. Then there are few machines called BBS which acts as a centralized data store that we use to coordinate information in a cluster. This is how Diego becomes a distributed system.

orchestrates?
Diego's orchestration is responsible for two things. 
1. Diego is a scheduler. So when you bring your droplet to Diego, Diego tries to optimally distributes it across running cells.
2. Meanwhile, Diego implements health monitoring. So if your application crashes, Diego notices and restarts it. If your entire cell crashes, Diego will notice and save those applications.

containerized workloads?
off-task is a unit of work that runs at most once inside a container. LRP or Long Running Process is complex. There can be 'N' long running instances that distributes across cells for high availability. There are LRPs and Tasks as well. This generic platform independent abstraction describes what Diego can do. Diego takes droplet which is the product of running 'cf push' and run buildpack based application on Diego. We are able to use same abstraction for docker based applications on Diego. 

Diego is responsible for the uptime of applications. It can stream output from the application processes and ensures the routing of requests to those applications. 


How Diego is related with Docker

Docker is a container engine that makes it easy to back, ship and run software inside containers. Cloud Foundry has been employing containers since a long time to run applications. We  might want to run multiple instances of same app, that's where containers come into help. Cloud Foundry uses 'garden' technology engine to run these containers.

So why use Docker? As we know, Docker provides a convenient way for distributing containers. It defines something called 'image' which we can push to 'Docker Hub', so that the whole community can make use of it. 

So if Docker is that good at distributed containers, why not combine the two: Cloud Foundry and Docker.  Diego is an approach taken by combining these two technologies.


Diego Architecture
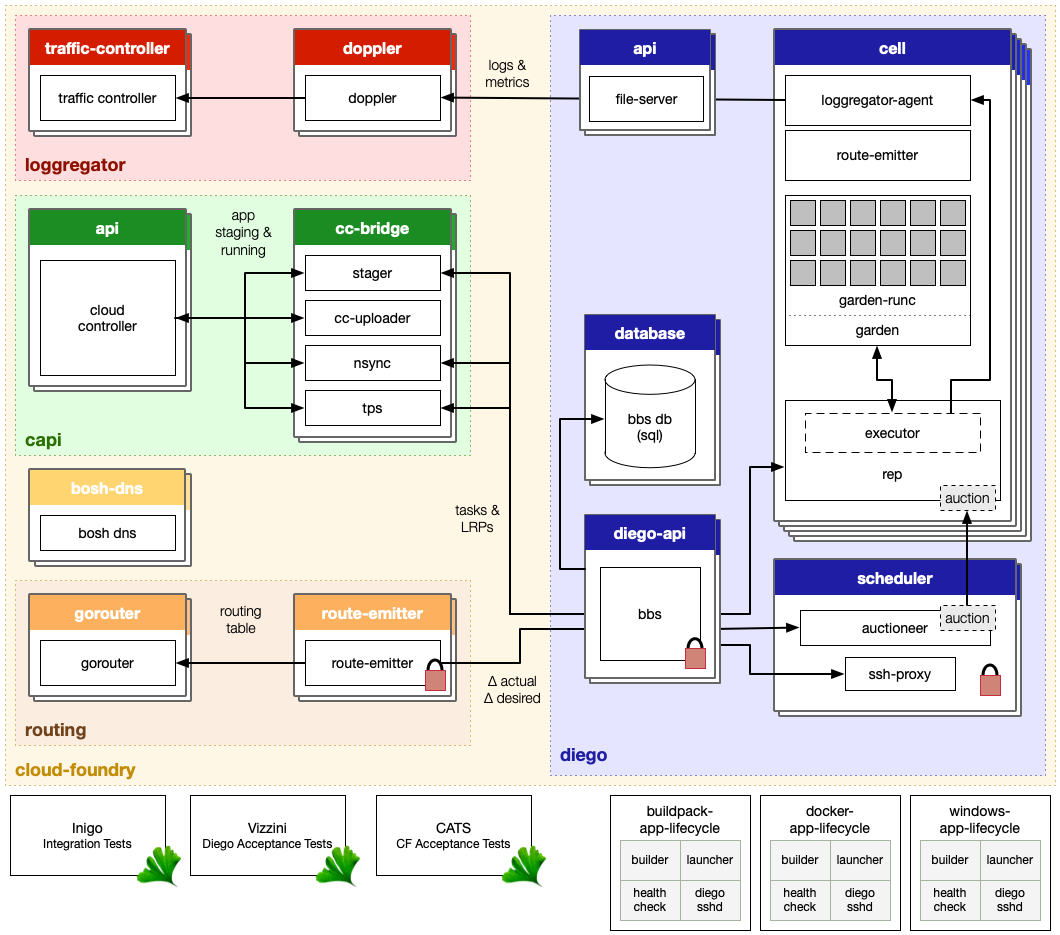


  1. The Cloud Controller passes requests to stage and run applications to the Cloud Controller Bridge (CC-Bridge).
  2. The CC-Bridge translates staging and running requests into Tasks and Long Running Processes(LRPs), then submits these to the Bulletin Board System (BBS) through an RPC-style API over HTTP. BBS acts as a centralized data store that we use to coordinate information in a cluster. 
  3. The BBS submits the Tasks and LRPs to the Auctioneer which is a part of the Diego Brain.
  4. The Auctioneer distributes these Tasks and LRPs to Cells through an Auction.
  5. Once the Auctioneer assigns a Task or LRP to a Cell, an in-process Executor creates a Garden container in the Cell. The Task or LRP runs in the container.
  6. The BBS tracks desired LRPs, running LRP instances and in-flight Tasks for the Converger which is a part of the Diego Brain. The Converger periodically analyzes this information and corrects discrepancies to ensure consistency between ActualLRP and DesiredLRP counts.
  7. Metron Agents which are part of the Cells, forward application logs, errors, and metrics to the Cloud Foundry Loggregator. 
  8. Loggregator is the Cloud Foundry component responsible for logging, provides a stream of log output from your application and from Cloud Foundry system components that interact with your app during updates and execution. By default, Loggregator streams logs to your terminal. If you want to persist more than the limited amount of logging information that Loggregator can buffer, you can drain logs to a third-party log management service. Cloud Foundry gathers and stores logs in a best-effort manner. 
As I have mentioned above, Diego runs Tasks and LRPs in containers. Implementation of containers is called 'Garden'. So why Gardens are powerful?

1. Garden allows Diego to pragmatically say three things. That is make me a container, put this in it, now go run this.This is done though a platform-agnostic API.'

2. Garden allows Diego's abstractions to be flexible.


Each time you make an app, it has to be staged. So we have a bridge component in the middle which does translations between different domains. When staging an application, Cloud Controller fires a 'stage app' request. This hits the stager. Stager translates it to a task that Diego runs. If this succeeds, then task is started and application can be run. 'Run app' request is hit by Nsync and Nsync translates it to a LRP(Long Running Process) that represents the application. LRP is managed by Diego.

Diego has matured that it can run your containers natively without having to install anything. You have to install Diego CLI that makes pushing these images easily. Diego CLI is installed with cf-CLI. If you want to run your Docker containers using Diego native support, you have to do,
cf push <app-name> -o <publicly available image in Docker Hub>.
Otherwise you can deploy Diego to Bosh-Lite so that you can get the experience of deploying Docker images locally in your machine.  
Key thing here is that Diego does not actually use Docker deamon to run an image. Rather than that, it just simulates Docker technology by using its own Garden tooling.  

Problems

Diego goes to internet, pulls out all bits of docker image and fires a container. Following problems came up with this approach initially.
                                                 1. Unpredictable scaling
                                                 2. Private images
                                                 3. Performance

1. Unpredictable scaling

Suppose you have started two instances of a certain publicly available image that you find in Docker Hub. These two instances have been running healthy for weeks and now you decide to scale them up. So you navigate to the console and type the following command.
 'cf scale -i <no of instance> <app-name> 
This tells Diego 'please start me this number of instances'. Then Diego goes to the internet, pulls latest version and completes your request. If in the meantime, the application provider decides to release a new version and push it to Docker Hub, then you will still end up running only two instances of that application because the previous version of that application is no longer supported. Thus you will have instances of both old version and new version. This is called unpredictable scaling.

2. Performance

Another more obvious problem is performance. This approach is poorly sub optimal to each and every request. When scaling the number of instances, it goes and downloads the whole Docker image for each and every instance. We know that containers tend to be bigger. So this approach is not optimal.

3. Private images

Diego lacks the private image support. Private images are available in Docker Hub, but they are protected by credentials. So if you want to support private images, then you need to deal with credentials. That's tricky. So either time you have to prompt user asking for credentials or else you have to steal credentials from database. This can be a problem if you are in an organization that decides to release your proprietary app in Docker Hub.


Solution

In order to solve the aforementioned problems, Cloud Foundry community came up with 'Private Docker Registry'. It is a registry for Docker images which is like Docker Hub. This runs only in Private Diego network. This is not accessible for developers and users. No one can push or pull images from this registry. It is there solely for the purpose of access by Diego. Hence Diego uses its as a cache. Let's see how this concept of 'Private Docker Registry' solves the previously mentioned issues. Suppose you want to start up your Docker app with this caching support.


1. Unpredictable scaling

During staging, Diego will reach out and pull all bits of Docker image. Then before it proceeds and start image, it will cache it in private registry so that it is available for being reused later when you decide to scale it up. This means that you no longer depends on what is available in Docker Hub during scaling. So you solve the unpredictable scaling problem. You can freely scale up and down without worrying what content might available in Docker Hub. So if Docker Hub goes down, you will not be impacted.


2. Performance

Performance by using this cache is bit better instead of going and downloading whole container all the time because you will be using something available in local network which is better.


3. Private images

So is this approach of using Private Registry solves the problem of private images? It's not exactly solving the problem. During staging, you need to pull docker image from Docker Hub, but it is really relaxing condition because right now you need to prompt user for credentials only during staging. If you do it once, user can freely scale up and down using cache version. So this makes users prompt for credentials during staging and throw them away.

That's how private registry solves the aforementioned problems. I supose that this post would have been useful to understand how Diego works in Cloud Foundry.


Deploying apps in Cloud Foundry


The best place to start with Cloud Foundry is to get the experience of deploying applications locally in the machine. This is what we called 'Mirco Cloud Foundry'.  For a novice Cloud Foundry developer, a full scale PaaS deployment is not possible and it is not an affordable choice. To address this issue, Cloud Foundry team released BoshLite which provides developers a method to deploy it locally in their machine.

It is important to understand the meaning of several terms prior to the deployment process. So let's concentrate on the terms, stemcell, release and deployment.

What is a stemcell?

Stemcell is a versioned Operating System image wrapped with IaaS specific packaging. A typical stemcell contains a bare minimum OS skeleton, a few common utilities pre-installed, a BOSH Agent, and a few configuration files to securely configure the OS by default. 

This clear separation between base Operating System and later-installed software is what makes stemcells a powerful concept. Stemcells for one OS (e.g. all Ubuntu Trusty stemcells) are exactly the same for all infrastructures. This property of stemcells allows BOSH users to quickly and reliably switch between different infrastructures . The Cloud Foundry BOSH team is responsible for producing and maintaining an official set of stemcells. 

By introducing the concept of a stemcell, the following problems have been solved: 

                           - Capturing a base OS image
                           - Versioning changes to the OS omage
                           - Reusing base OS image across Vms of different types
                           - Reusing base OS images across different IaaS

What is a release?

A release is a versioned collection of configuration properties, configuration templates, start up scripts, source code, binary artifacts and anything else required to build and deploy software in a reproducible way.A release is the layer placed on top of a stemcell. They are self-contained and provide very specific software for the purpose of that release. For example, a Redis release might include start-up and shutdown scripts for redis-server. 

The following tasks are done by a release: 

                          - Capturing all needed configuration options and scripts for deployment of the software 
                          - Recording and keeping track of all dependencies for the software 
                          - Versioning and keeping track of software releases
                          - Creating releases that can be IaaS agnostic 
                          - Creating releases that are self-contained and do not require internet access for deployment.

What is a deployment?

A deployment is a collection of VMs, built from a stemcell that has been populated with specific releases and disks that keep persistent data.These resources are created based on a manifest file in the IaaS and managed by the BOSH Director, a centralized management server.

The deployment process begins with deciding which Operating System images (stemcells) need to be used and which software (releases) need to be deployed. Combination of stemcells, releases, and operator-specified properties are contained in a human readable file called a deployment manifest. When a deployment manifest is uploaded to a BOSH Director, requested resources are allocated and stored. These resources form a deployment. A user can manage a deployment via its deployment manifest. A deployment manifest contains all needed information for tracking, managing, and updating software on the deployment’s VMs. 


Other than the above terms, there are some specific concepts relevant to user access control. Cloud Foundry uses role-based access control (RBAC), with each role granting permissions in either  an org or a space.

Orgs, Spaces, Roles and Permissions 

Orgs 

Development account that an individual or multiple collaborators can own and use. All collaborators access an org with user accounts. Collaborators in an org share a resource quota plan, applications, services availability, and custom domains. 

User Accounts

Represents an individual person within the context of a Cloud Foundry installation. A user can have different roles in different spaces within an org.

Spaces

Every application and service is scoped to a space. Each org contains at least one space. A space provides users with access to a shared location for application development, deployment, and maintenance. 

Roles and Permissions

A user can have one or more roles. The combination of these roles defines the user’s overall permissions in the org and within specific spaces. Then there are different roles like org manger, org auditor, billing manger, space manger, space developer, space auditor.


Install BOSH Lite

We are going to use bosh lite here. bosh-lite is a vagrant VM that comes with pre-installed BOSH server (Director). Once VM with Director is running we are going to use BOSH CLI to send commands to the Director.

Now we are almost ready to deploy applications in Cloud Foundry. After figuring out all the bits and pieces, I wrote down the following procedure of steps so anyone with an average IT knowledge who wishes to try out Cloud Foundry can get up and running a bit quicker than I did.

The main tutorial for deploying Cloud Foundry on Vagrant can be found on the following URL:
This tutorial is aimed at Linux users and comes with commands and scripts for such systems. I have listed the steps that I used to deploy Cloud Foundry and elaborated where I deviated from the tutorial.

Note:

This installation is only for 64-bit systems, as the stem cells are packaged as 64-bit images. This also means that this installation will only work on systems that support VT-x or some other hardware virtualization technology (AMD-V for AMD machines). It will also not work if you try and run this setup on a virtual machine, since you will be required another VM. Currently, VT-X can only be used by a single virtual machine.

Step1: Install latest version of bosh_cli

BOSH CLI is a command line interface to the Director. It is distributed as a Ruby gem.First we need to install Bosh-Lite. So we need to prepare the environment for that. As the first step, we install latest version of bosh_cli which is the Command Line Interface tool to interact with Bosh_Lite director (VM running the Bosh_Lite server). The README.md mentions the following command to install bosh_cli using gem.

$ gem install bosh_cli --no-ri --no-rdoc
This will give the following output. 
nanduni@nanduni-TECRA-M11:~$ gem install bosh_cli --no-ri --no-rdoc
Fetching: jmespath-1.1.3.gem (100%)
Successfully installed jmespath-1.1.3
Fetching: aws-sdk-core-2.2.0.gem (100%)
Successfully installed aws-sdk-core-2.2.0
Fetching: aws-sdk-resources-2.2.0.gem (100%)
Successfully installed aws-sdk-resources-2.2.0
Fetching: little-plugger-1.1.4.gem (100%)
Successfully installed little-plugger-1.1.4
Fetching: logging-1.8.2.gem (100%)
Successfully installed logging-1.8.2
Fetching: semi_semantic-1.1.0.gem (100%)
Successfully installed semi_semantic-1.1.0
Fetching: bosh_common-1.3184.0.gem (100%)
Successfully installed bosh_common-1.3184.0
Fetching: httpclient-2.4.0.gem (100%)
Successfully installed httpclient-2.4.0
Fetching: blobstore_client-1.3184.0.gem (100%)
Successfully installed blobstore_client-1.3184.0
Fetching: bosh-template-1.3184.0.gem (100%)
Successfully installed bosh-template-1.3184.0
Fetching: minitar-0.5.4.gem (100%)
Successfully installed minitar-0.5.4
Fetching: netaddr-1.5.0.gem (100%)
Successfully installed netaddr-1.5.0
Fetching: net-ssh-2.9.2.gem (100%)
Successfully installed net-ssh-2.9.2
Fetching: net-scp-1.1.2.gem (100%)
Successfully installed net-scp-1.1.2
Fetching: net-ssh-gateway-1.2.0.gem (100%)
Successfully installed net-ssh-gateway-1.2.0
Fetching: progressbar-0.9.2.gem (100%)
Successfully installed progressbar-0.9.2
Fetching: sshkey-1.7.0.gem (100%)
Successfully installed sshkey-1.7.0
Fetching: terminal-table-1.4.5.gem (100%)
Successfully installed terminal-table-1.4.5
Fetching: bosh_cli-1.3184.0.gem (100%)
Successfully installed bosh_cli-1.3184.0
19 gems installed

If this command does not work out for you, try the following command.
$ gem install --user-install bosh_cli


Step2: Install Vagrant

If you are not familiar about Vagrant and VirtualBox, go through my blog post

Check that you have Vagrant installed in your machine by using the following command.

$ vagrant --version
Vagrant 1.7.4


Step3: Install VirtualBox

Check that you have Vagrant installed in your machine by using the following command.
$ VBoxManage --version
5.0.10r104061


Step4: Clone the repository

$ cd ~/workspace
$ git clone https://github.com/cloudfoundry/bosh-lite


Step5: Start Vagrant

Navigate into the cloned repository. Start Vagrant from the base directory of this repository, which contains the Vagrantfile. The most recent version of the BOSH Lite boxes will be downloaded by default from the Vagrant Cloud when you run vagrant up. If you have already downloaded an older version you will be warned that your version is out of date.

$ vagrant up --provider=virtualbox


Step6: Target director

Let CLI know about bosh-lite Director. So target the BOSH Director.
If you work behind a proxy, exclude both the VM's private IP and xip.io by setting no_proxy.

$ bosh target 192.168.50.4 lite
Target set to 'Bosh Lite Director'


Step6: Login

Now login to Bosh. When prompted to log in, use admin/admin.
$ bosh login
Your username: admin
Enter password: *****
Logged in as 'admin'

If you logged in successfully, it should display the message that you have logged in successfully.


Step7: Add route entries


This is an important step that you should not miss. When I was installing Bosh Lite, I accidentally missed this step and it took me hours to find out the error.
 
Add a set of route entries to your local route table to enable direct Warden container access every time your networking gets reset (e.g. reboot or connect to a different network). Your sudo password may be required.

$ bin/add-route


Start deployment


Now that you have Bosh Lite installed in your machine, you require some kind of application to start with.  You have already completed the steps of preparing the required environment for deployment. I followed this tutorial to start with. It is guide to using BOSH.
This tutorial gives a simple introduction to BOSH. If you have never deployed with BOSH or never heard about it that step-by-step guide will bring you up to speed.

Before we proceed we need to understand what BOSH needs to deploy software.


What to deploy

Software that is deployed with BOSH needs to be packaged in a special format called release. For each service that will be deployed release needs to contain its source files, configuration files, installation scripts, etc. For example, for a redis-release, the source code for redis, redis configuration defaults and redis init scripts are part of the release.

How to deploy
Each BOSH deployment needs to provide a specially structured configuration file - deployment manifest. This file defines what resources are going to be deployed, what services are going to be running on each of resources and properties that will be passed to services configuration files. For example, for a redis deployment manifest, there are entries for how many and what size redis VMs there should be and how redis should be configured.

Step1: Create Bosh release

We are going to use a simple BOSH release that deploys a sinatra server. Clone the repository containing the application.

$ git clone https://github.com/mariash/learn-bosh-release learn-bosh-release
$ cd learn-bosh-release
$ bosh create release
What happens when you create a release is that it downloads all the ruby/bundler and other necessary packages and libraries for the release. Then if the packages are downloaded properly, then it will request a development release name. I gave it the name 'learn-bosh' . Then within the DevReleases folder, it will create a folder with that release name. This folder contains the release manifest, which is a yaml file.

Step2: Upload release

Upload generated release to Director.
$ bosh upload release


Step3: Check release

Now that you can check the uploaded releases.

$ bosh releases
Then it will show an output like this.

Acting as user 'admin' on 'Bosh Lite Director'
+------------+----------+-------------+
| Name | Versions | Commit Hash |
+------------+----------+-------------+
| learn-bosh | 0+dev.1 | 1867f1d2 |
+------------+----------+-------------+ 
Releases total: 1

Step4: Set deployment manifest

Deployment manifest specifies what services to deploy, their properties and resources configuration. The manifest in the folder contains a placeholder director_uuid that needs replacing. In order to obtain the correct uuid, use the following command.
$ bosh status --uuid

Or else use bosh status command and you will easily find the uuid.
Now set the deployment manifest.

$ bosh deployment manifest.yml
Deployment set to '...learn-bosh-release/manifest.yml'


Step5: Upload stemcell

A Stemcell is an operating system image that BOSH uses to create VMs. Official BOSH stemcells are maintained with security updates at bosh.io.

Upload stemcell to Director using the following command.

$ wget --content-disposition https://bosh.io/d/stemcells/bosh-warden-boshlite-ubuntu-trusty-go_agent
$ bosh upload stemcell bosh-stemcell-3147-warden-boshlite-ubuntu-trusty-go_agent.tgz


Step6: Check stemcells

You can verify the uploaded stemcells using the following command.
$ bosh stemcells 
Acting as user 'admin' on 'Bosh Lite Director'
+---------------------------------------------+---------+
(*) Currently in-use
Stemcells total: 1
| Name | Version |
+---------------------------------------------+---------+
| bosh-warden-boshlite-ubuntu-trusty-go_agent | 3147 |
+---------------------------------------------+---------+


Step7: Deploy

Use the following command to deploy.

$ bosh deploy
See the list of deployed VMs as it was specified in manifest. 
$ bosh vms ...
+-----------+---------+---------------+------------+
| Job/index | State | Resource Pool | IPs |
+-----------+---------+---------------+------------+
| app/0 | running | default | 10.244.0.2 |
+-----------+---------+---------------+------------+
...


Step8: Add route

Add route to bosh-lite network.

sudo ip route add 10.244.0.0/19 via 192.168.50.4


Step9: Running service

Now you can see that the service is up and running.

$ curl 10.244.0.2:8080
Hello, Maria from ...


Modify deployment

Now we will update our deployment with new version of software. We will modify some properties.

Step1: Modify release

BOSH makes it easy to modify and deploy new versions of software. Let's modify our release source files. In release folder open src/simple_server/app.rb. I changed the name to mine.

Then I create a new version of release. force option in the command is used to ignore warning about local changes. Then I upload the new version of release to Director and deploy.

$ bosh create release --force
$ bosh upload release
$ bosh deploy


Step2: Running service

See that the updated version was deployed accordingly.

$ curl 10.244.0.2:8080
Hello, Maria from ...

Scale deployment

Step1: Modify the manifest.

With BOSH it is easy to scale deployments. All you need to do is modify number of instances in manifest file. Open manifest.yml and change number of instances under job from 1 to 2. Add another IP to list of job static IPs: 10.244.0.6.

Step2: Run deploy

$ bosh deploy

Step3: Check VMs

Check that 2 VMs were deployed.
$ bosh vms 
Acting as user 'admin' on 'Bosh Lite Director'
Director task 22
Task 22 done
+-----------+---------+---------------+------------+
VMs total: 2
Deployment `learn-bosh' 
| Job/index | State | Resource Pool | IPs |
+-----------+---------+---------------+------------+
| app/0 | running | default | 10.244.0.2 |
| app/1 | running | default | 10.244.0.6 |
+-----------+---------+---------------+------------+

Step4: Running service

$ curl 10.244.0.2:8080
Hello, you from <uuid-1>
$ curl 10.244.0.6:8080
Hello, you from <uuid-2>


Updating the Bosh Lite VM

If you wish to upgrade the BOSH Lite VM, you can run the following commands from the root of the bosh-lite directory. Make sure you have the latest version of this repository checked out. WARNING: these operations are destructive, and essentially amount to starting from scratch.

$ git pull 
$ vagrant box update 
$ vagrant destroy 
$ vagrant up --provider=DESIRED_PROVIDER


Trouble shooting instances


1. When I tried to run the service using curl 10.244.0.2:8080 command, it gave me the following error.
curl 10.244.0.2:8080 
Curl(7): Failed to connect to 10.244.0.2 port 8080: Connection timed out 
This can be resolved by the following command which was mentioned in step7 of installing BOSH Lite. Navigate to the bosh-lite directory. Then use this command.
$ bin/add-route


2. sudo ip route add 10.244.0.0/19 via 192.168.50.4 command in step8 of Start deployment section did not work for me. Instead, I changed that command a bit as follows.
sudo route add -net 10.244.0.0/19 gw 192.168.50.4

3. When installing bosh_cli using gem, it gave me the following error. 
WARNING:You don't have /home/nanduni/.gem/ruby/1.9.1/bin in your PATH, gem executables will not run.
This is because I have not set the ruby path. So execute the following command to install bosh_cli successfully.
export PATH=”/home/nanduni/.gem/ruby/1.9.1/bin:$PATH”


These are some errors that I encountered when deploying applications in vagrant using bosh-lite. I would be happy if you all can share with me any other instances that you came across.