Diego : Next Generation Runtime of Cloud Foundry


You might be already wondering about what 'Diego' is. If so, this might be a very useful post for newbies in Cloud Foundry. So what 'Diego' actually is? How is it related to Cloud Foundry? How is it different from build-pack mechanism? Please be patient. You will soon find solutions to all your problems. Let's proceed then. 

What is Diego

In a Cloud Foundry deployment without Diego, the Cloud Controller schedules and manages applications on the Droplet Execution Agent (DEA) nodes. Diego replaces the DEAs and the Health Manager, and assumes application scheduling and management responsibility from the Cloud Controller. Diego combines scheduler, runner and health manager. DEA, Health manager and Warden were rewritten in 'Go' , DEA + GO , hence it is called 'Diego'. 

Diego is a rewrite of the Cloud Foundry runtime. Why this was written again? The existing code is hard to maintain and add features. In case of the DEA and Health Manager, which Diego removes the need for, the code was too enmeshed with the Cloud Foundry code-base. So they wrote Cloud Foundry again in a different way which is now called 'Diego'.

At its core, Diego is a distributed system that orchestrates containerized workloads. I will describe each of these terms  separately.

distributed system ? 
If you look into running Diego installation, you will see a pile of VMs which you call 'cells'. They have containers running applications in them. There is also a handful of highly available VMs called 'Brain'. Then there are few machines called BBS which acts as a centralized data store that we use to coordinate information in a cluster. This is how Diego becomes a distributed system.

orchestrates?
Diego's orchestration is responsible for two things. 
1. Diego is a scheduler. So when you bring your droplet to Diego, Diego tries to optimally distributes it across running cells.
2. Meanwhile, Diego implements health monitoring. So if your application crashes, Diego notices and restarts it. If your entire cell crashes, Diego will notice and save those applications.

containerized workloads?
off-task is a unit of work that runs at most once inside a container. LRP or Long Running Process is complex. There can be 'N' long running instances that distributes across cells for high availability. There are LRPs and Tasks as well. This generic platform independent abstraction describes what Diego can do. Diego takes droplet which is the product of running 'cf push' and run buildpack based application on Diego. We are able to use same abstraction for docker based applications on Diego. 

Diego is responsible for the uptime of applications. It can stream output from the application processes and ensures the routing of requests to those applications. 


How Diego is related with Docker

Docker is a container engine that makes it easy to back, ship and run software inside containers. Cloud Foundry has been employing containers since a long time to run applications. We  might want to run multiple instances of same app, that's where containers come into help. Cloud Foundry uses 'garden' technology engine to run these containers.

So why use Docker? As we know, Docker provides a convenient way for distributing containers. It defines something called 'image' which we can push to 'Docker Hub', so that the whole community can make use of it. 

So if Docker is that good at distributed containers, why not combine the two: Cloud Foundry and Docker.  Diego is an approach taken by combining these two technologies.


Diego Architecture


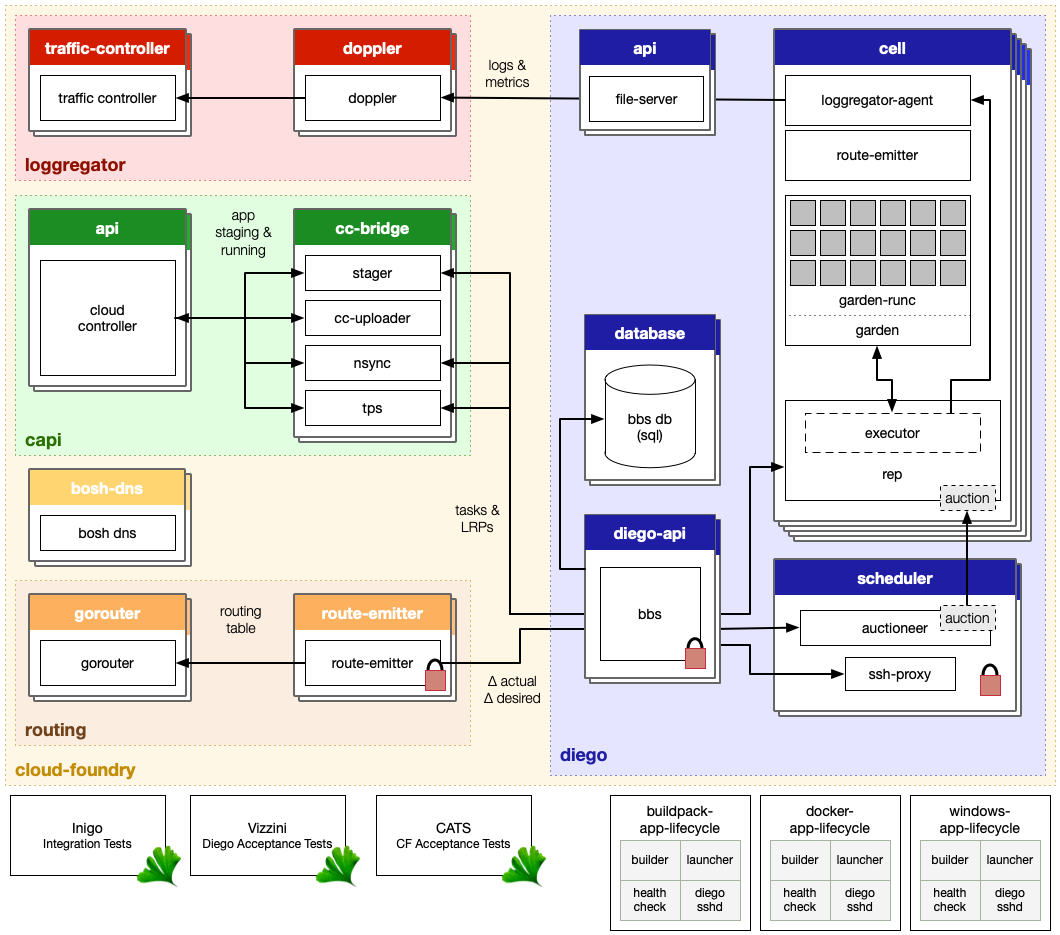
  1. The Cloud Controller passes requests to stage and run applications to the Cloud Controller Bridge (CC-Bridge).
  2. The CC-Bridge translates staging and running requests into Tasks and Long Running Processes(LRPs), then submits these to the Bulletin Board System (BBS) through an RPC-style API over HTTP. BBS acts as a centralized data store that we use to coordinate information in a cluster. 
  3. The BBS submits the Tasks and LRPs to the Auctioneer which is a part of the Diego Brain.
  4. The Auctioneer distributes these Tasks and LRPs to Cells through an Auction.
  5. Once the Auctioneer assigns a Task or LRP to a Cell, an in-process Executor creates a Garden container in the Cell. The Task or LRP runs in the container.
  6. The BBS tracks desired LRPs, running LRP instances and in-flight Tasks for the Converger which is a part of the Diego Brain. The Converger periodically analyzes this information and corrects discrepancies to ensure consistency between ActualLRP and DesiredLRP counts.
  7. Metron Agents which are part of the Cells, forward application logs, errors, and metrics to the Cloud Foundry Loggregator. 
  8. Loggregator is the Cloud Foundry component responsible for logging, provides a stream of log output from your application and from Cloud Foundry system components that interact with your app during updates and execution. By default, Loggregator streams logs to your terminal. If you want to persist more than the limited amount of logging information that Loggregator can buffer, you can drain logs to a third-party log management service. Cloud Foundry gathers and stores logs in a best-effort manner. 
As I have mentioned above, Diego runs Tasks and LRPs in containers. Implementation of containers is called 'Garden'. So why Gardens are powerful?

1. Garden allows Diego to pragmatically say three things. That is make me a container, put this in it, now go run this.This is done though a platform-agnostic API.'

2. Garden allows Diego's abstractions to be flexible.


Each time you make an app, it has to be staged. So we have a bridge component in the middle which does translations between different domains. When staging an application, Cloud Controller fires a 'stage app' request. This hits the stager. Stager translates it to a task that Diego runs. If this succeeds, then task is started and application can be run. 'Run app' request is hit by Nsync and Nsync translates it to a LRP(Long Running Process) that represents the application. LRP is managed by Diego.

Diego has matured that it can run your containers natively without having to install anything. You have to install Diego CLI that makes pushing these images easily. Diego CLI is installed with cf-CLI. If you want to run your Docker containers using Diego native support, you have to do,
cf push <app-name> -o <publicly available image in Docker Hub>.
Otherwise you can deploy Diego to Bosh-Lite so that you can get the experience of deploying Docker images locally in your machine.  
Key thing here is that Diego does not actually use Docker deamon to run an image. Rather than that, it just simulates Docker technology by using its own Garden tooling.  

Problems

Diego goes to internet, pulls out all bits of docker image and fires a container. Following problems came up with this approach initially.
                                                 1. Unpredictable scaling
                                                 2. Private images
                                                 3. Performance

1. Unpredictable scaling

Suppose you have started two instances of a certain publicly available image that you find in Docker Hub. These two instances have been running healthy for weeks and now you decide to scale them up. So you navigate to the console and type the following command.
 'cf scale -i <no of instance> <app-name> 
This tells Diego 'please start me this number of instances'. Then Diego goes to the internet, pulls latest version and completes your request. If in the meantime, the application provider decides to release a new version and push it to Docker Hub, then you will still end up running only two instances of that application because the previous version of that application is no longer supported. Thus you will have instances of both old version and new version. This is called unpredictable scaling.

2. Performance

Another more obvious problem is performance. This approach is poorly sub optimal to each and every request. When scaling the number of instances, it goes and downloads the whole Docker image for each and every instance. We know that containers tend to be bigger. So this approach is not optimal.

3. Private images

Diego lacks the private image support. Private images are available in Docker Hub, but they are protected by credentials. So if you want to support private images, then you need to deal with credentials. That's tricky. So either time you have to prompt user asking for credentials or else you have to steal credentials from database. This can be a problem if you are in an organization that decides to release your proprietary app in Docker Hub.


Solution

In order to solve the aforementioned problems, Cloud Foundry community came up with 'Private Docker Registry'. It is a registry for Docker images which is like Docker Hub. This runs only in Private Diego network. This is not accessible for developers and users. No one can push or pull images from this registry. It is there solely for the purpose of access by Diego. Hence Diego uses its as a cache. Let's see how this concept of 'Private Docker Registry' solves the previously mentioned issues. Suppose you want to start up your Docker app with this caching support.


1. Unpredictable scaling

During staging, Diego will reach out and pull all bits of Docker image. Then before it proceeds and start image, it will cache it in private registry so that it is available for being reused later when you decide to scale it up. This means that you no longer depends on what is available in Docker Hub during scaling. So you solve the unpredictable scaling problem. You can freely scale up and down without worrying what content might available in Docker Hub. So if Docker Hub goes down, you will not be impacted.


2. Performance

Performance by using this cache is bit better instead of going and downloading whole container all the time because you will be using something available in local network which is better.


3. Private images

So is this approach of using Private Registry solves the problem of private images? It's not exactly solving the problem. During staging, you need to pull docker image from Docker Hub, but it is really relaxing condition because right now you need to prompt user for credentials only during staging. If you do it once, user can freely scale up and down using cache version. So this makes users prompt for credentials during staging and throw them away.

That's how private registry solves the aforementioned problems. I supose that this post would have been useful to understand how Diego works in Cloud Foundry.


Cloud Foundry - cf push


'cf push' is the command used in Cloud Foundry for uploading the applications to Cloud foundry. You can deploy an application to Cloud Foundry by running a cf push command from the Cloud Foundry command line interface ( cf CLI). I suppose that you have cf CLI tool installed in your machine already. If you need any help, visit my blog post on it.

Onsi Fakhouri during his tech talk in Cloud Foundry Summit 2015, describes cf push in the following way.

cf push :         Here is my source code
                        Run it on the cloud for me
                        I do not care how ...

I feel this is the best explanation for cf push command. Yes it is. I wonder how he has come up with this attractive explanation.

If we analyse deeply, between the time that you run push and the time that the application is available, Cloud Foundry performs the following tasks:

                 - Uploads and stores application files
                 - Examines and stores application metadata
                 - Creates a “droplet” (the Cloud Foundry unit of execution) for the application
                 - Selects an appropriate droplet execution agent (DEA) to run the droplet
                 - Starts the application

That is the process of 'cf push' in brief. Let me explain it further.

1. First you need to target at Cloud Foundry. For example, you can do it as follows. Or else you can point the URL along with cf target command.
$ cf target
API endpoint:   https://api.run.pivotal.io (API version: 2.48.0) 
User:           nanduni@wso2.com   
Org:            nanduni-org   
Space:          development  
So, why do you need to select a target? 
Simply it's because that Cloud Foundry is capable of connecting to any Cloud Foundry instance whether it is at pivotal.io or elsewhere. Selecting a target allows you to use same CLI to interface with multiple Cloud Foundry clouds in the same way.
2. Successfully targeted to the pointed URL. This indicates that cf was able to get a valid response from that specified URL, in my case from pivotal. Moreover it means that what we have targeted is to a valid Cloud Foundry instance.
3. Logging to cf. We can use cf login command for this. Then you are prompted to enter your email address and password. Credentials are passed via cf to Cloud Foundry where they are validated. Cloud Foundry then issues a security token back to Cloud Foundry client. 
4. Successfully logged into the specified URL, in my case api.run.pivotal.io. Once cf client has received the security token, the client is able to issue commands to control instances on Cloud Foundry through cf.  
5. cf push to deploy an application. You can give the command cf push along with your app name. Naming your application like that gives ability to use a simpler, friendly name when referencing the application inside Cloud Foundry. This name can be disconnected from deployed URL where users access application. You can either define a name for your application with cf push command or with manifet.yml file. 
- name: myapp
6. Application deployed URL is where users access your application through the internet or outside of your Cloud Foundry instance. You can define a name for the URL in the manifest.yml file as: 
host: nandy
7. Memory reservation allows you to determine how much memory your app will need. Ensure that you are staying within your quota limits of system. You can define this in the manifest.yml file as : 
memory: 256M
8. cf has created an application locally. That means that all metadata has been created and saved. app metadata makes up manifest and includes app name, URL, framework, run-time, instances needed and memory reservation.
9. Bind services for your application. An application that uses services, such as a database, messaging, or email server, is not fully functional until you provision the service and, if required, bind the service to the application. Binding services offers ability to add capabilities such as Redis, MySQL, other services such as messaging. 

Cloud Foundry offers a marketplace of services, from which users can provision reserved resources on-demand. Examples of such resource services include databases on a shared or dedicated server or accounts on a SaaS application. These resources are known as Service Instances and the systems that deliver and operate these resources are known as Services. Think of a service as a factory that delivers service instances.

User-Provided Service Instances
Cloud Foundry enables users to integrate services that are not available in the marketplace with their applications using a feature called User-Provided Service Instances (UPSI).
10. Preprocessing : Because your application runs remotely, it has to be preprocessed before sending to Cloud Foundry.
11. Checking for available resources is examining metadata and manifest to decide what it needs to send. Metadata, components(eg: gems + libraries + npm) are examined. Manifest is then sent to Cloud Foundry. 
12. App has been successfully packaged. When packaging begins, manifest is sent from Cloud Foundry to cf. Manifest lists files only cf needs, not all of the files that makes the application. This method of only requesting and sending what is needed makes uploading far efficient than if application or code files are sent with each push.

13. cf copies necessary files and compresses them.
14. cf manifest is prepared along with the compressed file containing all the code required by Cloud Foundry.
  
15. File is uploaded to Cloud Foundry.
16. cf uploads application along with manifest and compressed file. If you are re uploading, cf will not upload again. This is to increase upload efficiency, because there are more likely to be files that cf has seen before.
17. Push status returns Ok. Then the app has been received by Cloud Foundry and now it can be staged.  
18. Staging app does not return Ok until Cloud Foundry has successfully allocated resources and environment for the application to run.
19. App starts automatically unless you add -no--start to command line when doing cf push. Starting app will not return Ok until cf receives information from Cloud Foundry that all application instances are healthy and running. 

20. Visit deployed URL.  You can find it easily from the output of successfully terminated cf push command. 


I think this blog post would have been useful to understand the background process of cf push command as well as the process of deploying an application in Cloud Foundry. I will add more posts on new features of Cloud Foundry in the near future.  I am hoping to add a post on "Cloud Foundry with Diego" very soon.


Integrating Docker with Cloud Foundry


Docker and Cloud Foundry are two of my favorite topics. So I thought why not put them together and write a blog post on integration of Docker in Cloud Foundry.  Let's see how these two technologies work together. Both of them try to solve one problem. You have software and you want to ship and deploy that software. That's what both technologies suppose to do. But they are completely different. Cloud Foundry has all the stuff around it such as combining services, health monitoring, load balancing, scaling and so it is very complex. Docker on the other hand is pretty light weight, allows to create a container for your application, use it and ship it wherever you want to. So there are interesting use cases if you start using them together.

There are many solutions for deploying your docker containers in Cloud Foundry. In this post, I will be focusing on some of them. 

Docker and Cloud Foundry

                                  
                                1. Docker Buildpack
                                2. Docker Service Provider
                                3. Cloud Rocker
                                4. Diego
                                5. Lattice


1. Docker Buildpack

A buildpack creates the environment for an application to run. A docker buildpack uses all the benefits of the Cloud Foundry platform for Docker containers. Doug Davis of IBM had been capable of creating a Docker buildpack. 
You can get it from https://github.com/duglin/cf-docker.
This Docker buildpack allows me to just push my Docker container up to Cloud Foundry using the same cf CLI tool that we use with pivotal. You can run the command, 
                              cf push <name of Docker image>

So this approach is really cool. The problem with this approach is that it requires an external Docker host to be maintained some where outside of Cloud Foundry. So if you host your own Cloud Foundry system or Docker farm, you will have to face some troubles. And also it does not take a Dockerfile, it takes the URL of a Docker image from public Docker Registry. So it is limited in that way. The explanation at README.md clearly tells that,
"This is just a proof-of-concept and therefore has some limitations but does show what the basic user experience might be like if Cloud Foundry supported Docker in a first class way."

There are some barriers with Health Manager as well. So if a docker container fails or stops, Cloud foundry is not able to detect it with hundred percent guarantee. Besides that, you get all the benefits from Cloud Foundry such as load balancing, log aggregation, authorization to Cloud Foundry system etc. But you don't get the total Cloud Foundry experience or Docker experience. Any way it is a very interesting project.

2. Docker Service Provider

This is a service provider to expose Docker containers as services. If we relate to this to an example like MySQL, MySQL service provider stays between Cloud Foundry installation and MySQL cluster and it is responsible for spinning up the database, configure authentication and so on. In case of Docker service provider, we can configure it in a way that if a certain application requires a Redis service, then it should spin up a Redis container. If it requires a Postgres database, it should spin containers accordingly. So I can tap in to the Docker Hub Registry and look at all those containers that are provided by different people to provide all those database services in order to make them accessible to my application. This is not that difficult to install.

This also has the limitation that this also requires an external Docker host which can be installed through Bosh. Bosh allows to get all this quickly up, run and orchestrated. Here is that corresponding repository.

3. Cloud Rocker

This is a project carried out by a company called 'Cloud Credo'. What they tried to do is to build docker images using Cloud Foundry buildpacks. The expectation is to provide rapid turnaround for local development. This is also an interesting project. 

This is how it works. You have your application and the Cloud Rocker installation running. Then you upload your buildpack to Rocker system, which is a VirtualBox machine. Application is deployed using that buildpack and output of that will be a docker container. So here it uses the buildpack system for Cloud Foundry and the output is a docker image which I can push it to wherever I want to. So that's really cool. This makes lot of sense if you want to leverage the buildpack system and create a docker container.

So if you don't want to use Cloud Foundry, but you want to use its buildpack system, this is the best choice for you. 

This uses couple of Cloud Foundry tools to run the buildpack. It does not run inside Warden, hence it runs inside a docker container. It uses your internal docker host and it spins up docker containers to deploy your applications into a droplet. 

4. Diego

Deigo is a rewrite of Cloud Foundry DEA (Droplet Execution Engine). DEA uses warden inside to put all things into containers. A language called 'Go' is used to rewrite this. Diego is special beacause it provides built-in-support for Docker containers. So now you are able to push your containers with Diego.

This project started in a small scale and now they have almost rearchitectured the Cloud Foundry system. It has changed how container placement works, how health management works, what information is stored in the Cloud Controller etc. It is abstracting from Linux containers and they are planning to use Windows containers as well.  You are able to push your Docker containers via Diego. Meanwhile you get all the benefits from Cloud Foundry. 

run.pivotal.io now supports Diego and you can also experience it locally in your machine by deploying Diego to BOSH-Lite. 

So now you have the option either to push up your application or container. Interesting point here is that you are unable to push your Dockerfile. But you are able to push up your Docker image. The reason for that is Docker files are not stable over the time. 

I am hoping to write a separate blog post on Diego very soon. So I will be ending this topic from here.

5. Lattice

Diego components can be used to run containers, run applications, compile your applications and buildpacks. So people started to think more and more on what we can do with this stand alone component. So they decided to patch that up in a way that you end up with a very light weight PaaS. And they named it as 'Lattice'. 

In short, Lattice is a standalone scheduler extracted from Diego for Docker images. Diego is the core of Lattice and they put some other components around it, manly the routing layer, log aggregation layer etc. With all these packed together, it allows you to push your Docker containers, scale it up and down, do load balancing, monitor health and log aggregation etc. The nice thing about this Lattice system is that it is super light weight. 

So if Cloud Foundry is too much for you, Lattice might be an interesting project for you. Lattice tries to be little simpler and easier to set up with less features around it.


Containers vs Buildpacks : What to choose?

Cloud Foundry allows you to deploy containers and applications through buildpacks. So which should you choose? 

As an application developer, should I develop a container for my application and push up the container or should I push up the application and trust on the buildpack?

Answer to this question is not that simple. It depends on many things. Given below is a general recommendation, but you can select your own preference.

Containers are better when,
                        - Developers require more control
                        - Developers know Operations/Docker
                        - Time to market is important

It seems that the choice of buildpacks or containers depends on the application developer, operator, environment, requirements etc. If we really want to get something really fast, Cloud Foundry recommends to build a docker container and push it, so that we can use that container for local testing as well. But the drawback that lies here is that the developers have to know about Docker and other operations. (eg: how to write a Dockerfile). Thus developers have to be interested in Docker and stay up to date. They say that if the developer needs to set up the environment instead of the operator, this approach would be perfect. 

Buildpacks are better when,
                        - Operations require more control
                        - Developers focus on application
                        - Low maintenance cost is important

Cloud Foundry suggests that buildpacks are suitable if you don't want to use Ubuntu, Red Hat, Fedora, CentOS or different java versions that need to be patched differently or else if you don't want to use different custom things etc. Hence the developer can focus more on application logic and business logic rather than running Dockerfiles. Any way, the buildpack approach also ends up in a container(droplet) eventually.

Low maintenance cost can be achieved with buildpacks because this approach does not end up with very heterogenic container cluster where every container is really different, then you have to come up with different ways when you need to patch something. But with buildpacks, we can patch up one buildpack so that we can deploy all applications and go ahead. I suppose this might be a reason for mentioning it as a low maintenance cost. 

I hope that this has been a nice post to help you clear out most of your doubts on integrating Cloud Foundry with Docker.